Questa è una vecchia versione del documento!
Indice
Instructions for the VPN-OUT UNITN service
NOTE: for MacosX Yosemite only Junos Pulse is supported
NOTE2: after the upgrade to MacosX El Capitan it may be necessary to delete the Junos Pulse connection and recreate it from scratch
The VPN-OUT service allows access to internal resources of the University network from external locations. All the Internet traffic flows as it was generated by an UniTN internet address.
It is based on SSL encryption.
For the usage and configuration, visit the right section:
| Operating System | Supported Client | Instructions |
|---|---|---|
| Linux | Network Connect | Network Connect |
| Linux from command line (shell) | Network Connect | Network Connect (command line) |
| Macosx, Windows | Junos Pulse | Junos Pulse |
| Mobile Devices (Smartphone & Tablet) | Junos Pulse | Junos Pulse App |
Windows / MAC / Linux PCs
Installing the Network Connect client
Before being able to use the service, you need to install the “Network Connect” client.
NOTE:
- Before starting, it is recommended the elimination of the old vpn connection (if any)
- The PC must have a correct proxy configuration: proxy automatically configured by http://proxypac.unitn.it (internal networks) or no proxy (external networks ES: home ADSL)
To install “Network Connect” on your PC there are 2 possible ways:
1) MANUAL MODE
REQUISITES:
- Administrator rights (Windows), root privileges (Linux / Mac)
INSTRUCTIONS:
- Manually download, from the links below, the “Network Connect” client suitable for your operating system:
| Operative System | Download link |
|---|---|
| Windows 32bit | Network Connect 8.0R11 (build 36363) |
| Windows 64bit | Network Connect 8.0R11 (build 36363) |
| Linux | Network Connect 8.0R11 (build 36363) |
For Mac and Safari: Warning !!! Be sure that your browser is saving the file with .dmg extension (and not .exe) as “networkconnect.dmg”.
| Operative System | Download link |
|---|---|
| Mac OS X | Network Connect 8.0R11 (build 36363) |
- Run the downloaded installation package on your PC
- NB: you will need Administrator rights (Windows), root privileges (Linux / Mac)
2) "WEB" MODE
REQUISITES:
- Administrator rights (Windows), root privileges (Linux / Mac)
- Browser with Java JRE 6 or higher installed and running
- after Java 7u51 update, you need to add a security exception in the Java Control Panel under “Security⇒Exeption Site list” and add the URL https://vpn-ssl.unitn.it to the exceptions list.
- Verification and updating Java installation: http://www.java.com/it/download/testjava.jsp
- Java installation instructions: http://www.java.com/it/download/help/download_options.xml
- For Ubuntu Linux + Firefox you have to install the IcedTea-Web Plugin (via Firefox Add-ons Manager) and OpenJDK 6 or 7 (via apt-get see below)
NOTE FOR LINUX 64bit:
- Linux 64bit is currently only supported with 32bit client then you also need the 32bit Java version
- On Ubuntu Linux 64bit (12.0.4) you have to install the openjdk 6 or 7 (32bit) with this command: “sudo apt-get install openjdk-6-jre:i386” or “sudo apt-get install openjdk-7-jre:i386”
INSTRUCTIONS:
- Connect with a browser at https://vpn-ssl.unitn.it/vpn-out, logging in with your credentials of the university.
- click on “Start” near the “Network Connect” entry
- “Network Connect” will be installed and run on the client PC (agree to the changes and accept all security warnings if any)
ONLY FOR WINDOWS:
Using the Network Connect client
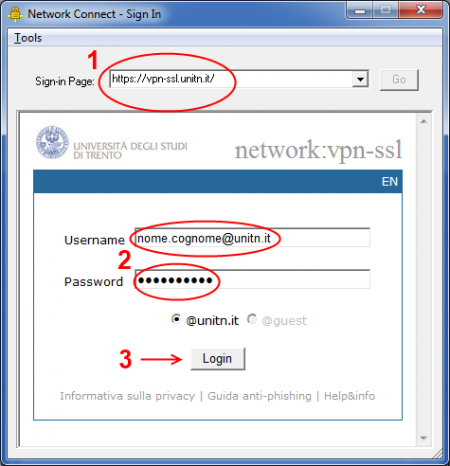
Once the Network Connect client has been installed with one of the previous mode, for further connections, simply launch Network Connect application on your PC, a connection window appears:
NOTE:
- Before starting, it is recommended the elimination of the old vpn connection (if any)
- The PC must have a correct proxy configuration: proxy automatically configured by http://proxypac.unitn.it (internal networks) or no proxy (external networks ES: home ADSL)
At this point, just perform these 3 simple steps:
- Insert the connection URL (Sign-in Page): https://vpn-ssl.unitn.it/vpn-out (if not already present)
- Enter username and password (University credentials)
- Click “Login”
In a few seconds you will be connected to the VPN session.
ONLY FOR WINDOWS:
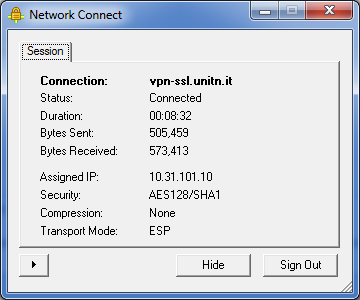
- By double clicking the icon, you can view the connection information:
NB: you can always make the connection by accessing via browser by repeating the steps above in the section 1) “WEB” MODE
Using the Network Connect client from the command line (Linux)
After the succesful installation of Network Connect, you can connect directly from the command line, the files are in the directory /home/user/.juniper_networks/network_connect
if you can't find this directory, you can download and extract this archive: nc.tgz
Follow this procedure (tested on Ubuntu 64bit 12.0.4):
- 1) move to the directory /home/user/.juniper_networks/network_connect (or where you have extracted the archive) and check the files:
user@linux:home/user# cd .juniper_networks/network_connect
- 2) Download the ssl vpn certificate (check if the file “certificato_vpn-ssl.crt” is already present in your directory first)
user@linux:home/user/.juniper_networks/network_connect# openssl s_client -connect vpn-ssl.unitn.it:443 -showcerts < /dev/null 2> /dev/null | openssl x509 -outform der > certificato_vpn-ssl.crt
- 3a) to establish the connection with the control applet (insert the password when required):
user@linux:home/user/.juniper_networks/network_connect# /usr/lib/jvm/java-6-openjdk-i386/bin/java -jar NC.jar -h vpn-ssl.unitn.it -u username@unitn.it -f certificato_vpn-ssl.crt -r AR-unitn-ldap-ad
Searching for ncsvc in current working directory done
Password:
- 3b) to establish the connection in “silent” mode, without control applet (insert the password when required):
user@linux:home/user/.juniper_networks/network_connect# ./ncsvc -h vpn-ssl.unitn.it -u username@unitn.it -f certificato_vpn-ssl.crt -r AR-unitn-ldap-ad
Password:
Connecting to vpn-ssl.unitn.it : 443
- 4) Check and verify the connection status:
user@linux:home/user/.juniper_networks/network_connect# ip addr show tun0
8: tun0: <POINTOPOINT,MULTICAST,NOARP,UP,LOWER_UP> mtu 1400 qdisc pfifo_fast state UNKNOWN qlen 500
    link/none
    inet 10.31.0.36/32 scope global tun0
MACOSX 10.9 Maverick, Windows (Junos Pulse)
As an alternative to Network Connect, for MACOSX (>10.6) and Windows it is possible to download and use Junos Pulse following the instructions below (screenshots taken from MACOSX 10.9)
NB: for MacOSX 10.9 Maverick Junos Pulse is the ONLY supported client
| Junos Pulse Download |
|---|
| MACOSX (>= 10.6) Junos Pulse 4.0.8.42127 |
| Windows XP, Vista and Windows 7 (32bit) Junos Pulse 4.0.8.42127 |
| Windows XP, Vista and Windows 7 (64bit) Junos Pulse 4.0.8.42127 |
For Mac and Safari: Warning !!! Be sure that your browser is saving the file with .dmg extension (and not .exe) as “pulse.dmg”.
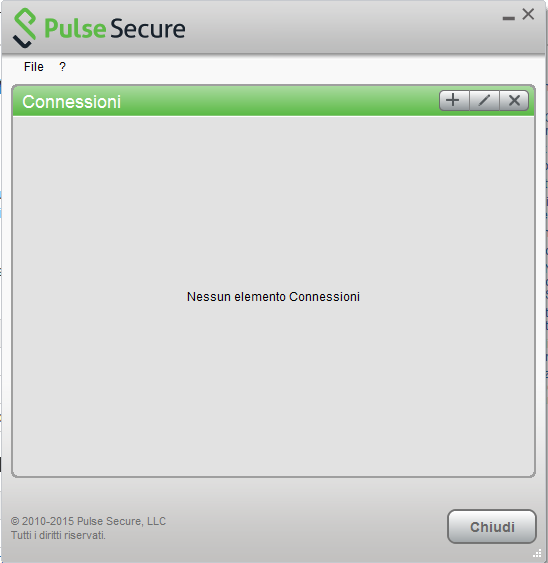
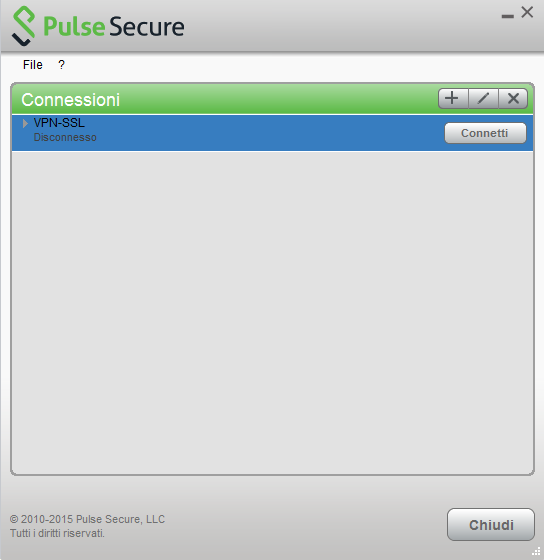
After the installation, launch the Junos Pulse Application, the main screen appears:
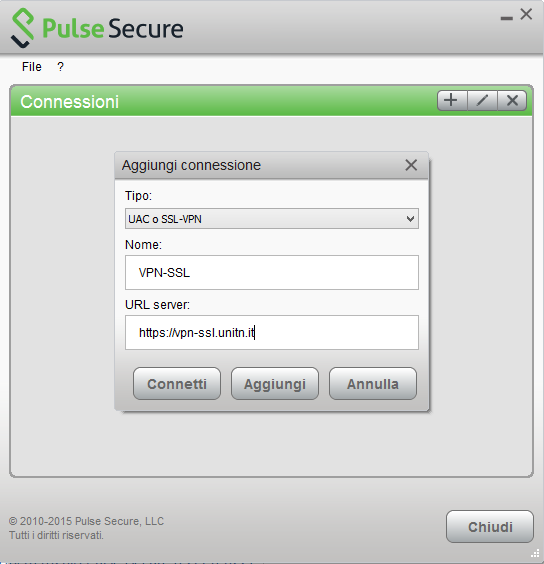
Create a new connection by clicking the '+' sign and entering the following parameters:
To start the connection, click on <Connect>
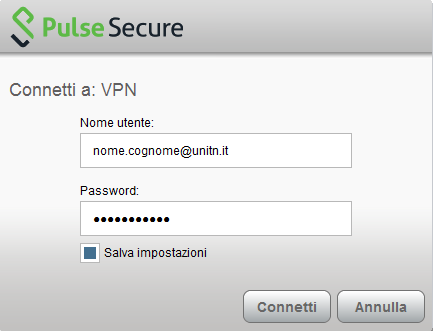
Fill the form with the username (@unitn.it) and password:
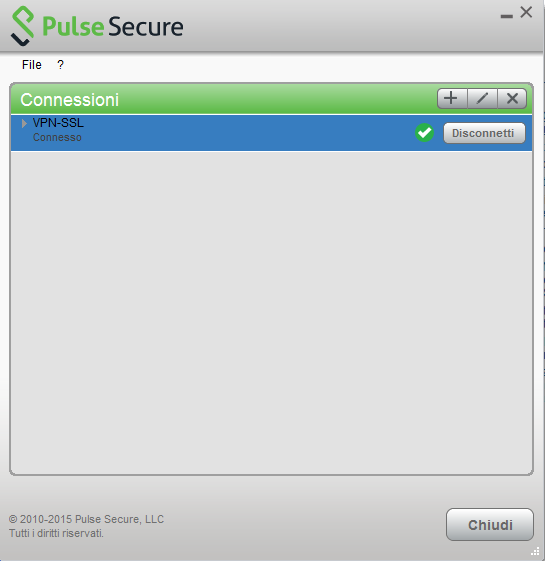
The connection is etablished, you can stop the vpn clicking on <Disconnect>
On the top you can see the Junos Pulse menu bar with the status icon:
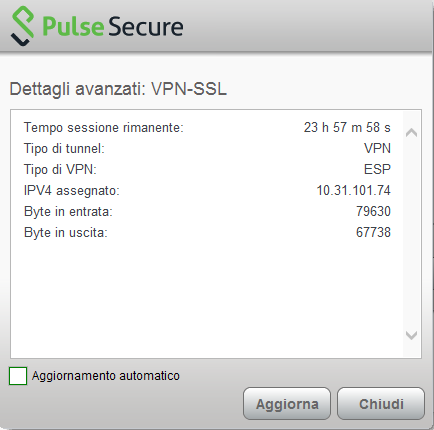
You can show a status window from File→Connections→Advanced Connection Details…
It is possible to verify the assigned vpn ip from a terminal window with the 'ifconfig' command:
MAC user$ ifconfig
lo0: flags=8049<UP,LOOPBACK,RUNNING,MULTICAST> mtu 16384
....
....
utun0: flags=8051<UP,POINTOPOINT,RUNNING,MULTICAST> mtu 1400
	inet 10.31.101.10 --> 10.31.101.10 netmask 0xffffffff
Mobile Devices
REQUISITES
- iPhone, iPod Touch, iPad (iOS 5.0,4.3.x,4.2.x or higher)
- Android devices 4.0 or higher
- Windows Mobile 6.5
INSTRUCTIONS: (screenshots related to Android version 4.1.2)
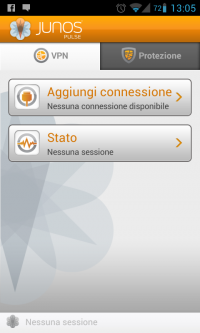
- Install the app “Junos Pulse” from ther App Store or Google Play
- Start the application “Junos Pulse”
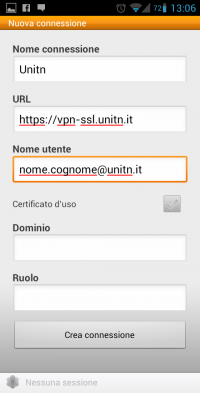
- Create a new connection by entering:
- “Connection Name” (your choice)
- “User Name” (in the form username@unitn.it)
- Touch on “Create Connection”
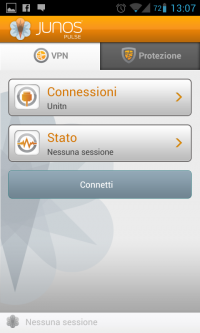
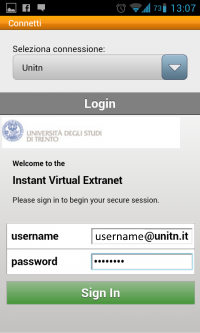
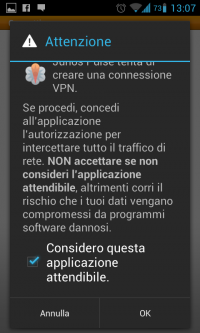
- Tap on “Connect”, enter your password and select “Sign In” (possibly accept the warning about security and trusted application)
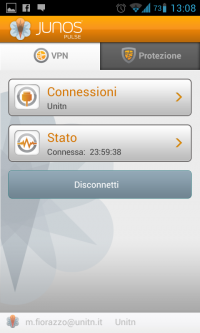
- At this point the connection is established, verifiable by a touch on “Status”
- At the end of the session, to end the connection, tap on “Disconnect”
Features of vpn-ssl service
IP addresses assigned to the clients
To connected vpn clients is assigned an ip in the range from 10.31.0.10 to 10.31.0.254
"split-tunnel" mode
The VPN connection provides traffic directed to intranet IP using the VPN tunnel while traffic to other networks (eg Internet) is provided by standard client connection (eg ADSL at home).
NB: the routing change doesn't affect the already “established” connections at the moment of the connection
User-side Firewall rules
VPN traffic is encrypted in SSL and uses TCP destination port 443. For the ESP mode (which increases performance) you must open the UDP destination port 4500 too.
Supported clients
| Platform | SO | Browsers and Java Environment |
|---|---|---|
| Windows | - Windows 8 on 32-bit or 64-bit platforms.- Windows 8 Enterprise on 32-bit. - Windows 7 on 32-bit or 64-bit platforms - Windows 7 SP1 Enterprise on 32-bit - Windows Vista on 32-bit or 64-bit platforms - Windows XP with SP3 on 32 bit | - Internet Explorer 10 - Internet Explorer 9.0 - Internet Explorer 8.0 - Internet Explorer 7.0 - Firefox 3.0 and above including FF10 - Oracle JRE 6 and above |
| Mac | - Mac OS X 10.6.x, 32 bit and 64 bit - Mac OS X 10.7.x, 32 bit - Mac OS X 10.8.x, 32 bit | - Safari 6.0 Sun JRE 6 - Safari 5.1 Sun JRE 6 - Safari 5.0 Sun JRE 6 |
| Linux | - OpenSuse 10.x and 11.x - Ubuntu 9.10, 10.x and 11.x - Red Hat Enterprise Linux 5 | - Firefox 3.0 and above - Oracle JRE 6 and above |
| Solaris | - Solaris 10, 32 bit only | - Mozilla 2.0 and above |
NOTE:
1) IE 10 is supported in Windows 8 Desktop Mode on Windows 8
2) 32 bit Network Connect is supported only on the following distributions:
| Platform | Operating System | Browsers and Java Environment |
|---|---|---|
| Linux | - Ubuntu 12.04 LTS - OpenSUSe 12.1 - Fedora 17 | - FireFox 10-ESR - Oracle JRE 6 and 7 - IcedTea-Web 1.2 with OpenJDK 6 and 7 |
Other operating systems, browsers and versions of Java, it may work by requiring, in some cases, possible interventions configuration on the client.


